Troubleshooting
Corrective actions for hardware and software issues.
Memory Gauges
LED on the battery does not flash after the battery is installed in the gauge
1. Battery was not installed correctly. Solution: unplug the battery and plug it back in again.
2. Not enough power from the battery. Solution: use the battery tester to check the voltage. Depassivate the battery and recheck. Change to a new battery if voltage does not read 3.6V when tested after depassivation.
3. LED on battery is not working. Solution: check the LED.
4. Gauge is defective. Solution: first test the interface box to ensure it is working properly. Do this by attaching a different gauge to it, then attaching to a computer and launching the SmartView software. Once you have confirmed that the interface box is working correctly, attach the gauge (without the battery installed). If the gauge can not be connected to the software with a working interface box, it may be defective. Return the gauge to the manufacturer for testing.
5. Memory is full. Solution: erase the memory.
Data recorded to memory is noisy
Low voltage to the transducer. Solution: use the battery tester to check the voltage. Depassivate the battery and recheck. Change to a new battery if voltage does not read 3.6V (higher for Geothermal Memory Tools) when tested after depassivation.
Data is out of the gauge specifications
Gauge is no longer calibrated correctly. Solution: use the Diagnostics function, in SmartView, to check if the gauge is sending the correct data, and verify with the calibration records. Send the gauge for recalibration if needed.
The gauge was detected, but then it stopped communicating with the software or software doesn't detect the gauge at all.
1. Gauge is no longer properly connected to the computer. Solution: make sure the USB interface box (cable) is connected securely to the computer. Additionally you can refer to section 2.3 of the SmartView manual for more information.
2. Interface box is defective. Solution: first test the interface box by attaching a different gauge to it, then attaching to a computer and launching the SmartView software. If you do not have automatic detection on in your Startup Settings (Options Page) then be sure to click the Connect New Tool button. If the different gauge is not detected there may be an issue with the USB interface box.
3. Software or drivers are corrupt or damaged. Solution: upgrade to the latest software version which can be found in the downloads section of the website or reinstall the current version (ensure USB devices are disconnected when installing).
4. COM port is locked. Solution: reboot the computer and restart the software.
5. COM port is defective. Solution: try another device on the same port to confirm the port is defective. Have the port repaired and either use a different port or computer.
6. Gauge is defective. Solution: try connecting a different gauge to confirm if gauge is defective. Return the gauge and/or interface box to PPS.
Could not download job files.
Record files are corrupt. Solution: use the "DUMP" function to dump memory of the gauge and then send to PPS for data retrieving.
Gamma ray reading is zero (Geothermal Memory Tool)
Sampling rate set incorrectly. Solution: set the sampling rate to 0.1 seconds/sample.
Software Issues
Software won't install
1. Software version is incompatible with 64-bit Windows environment. Solution: some older versions of the software are not 64-bit compatible, so they won't work on most new computers. Ensure you are using the latest version, which can be found on our website in the downloads section.
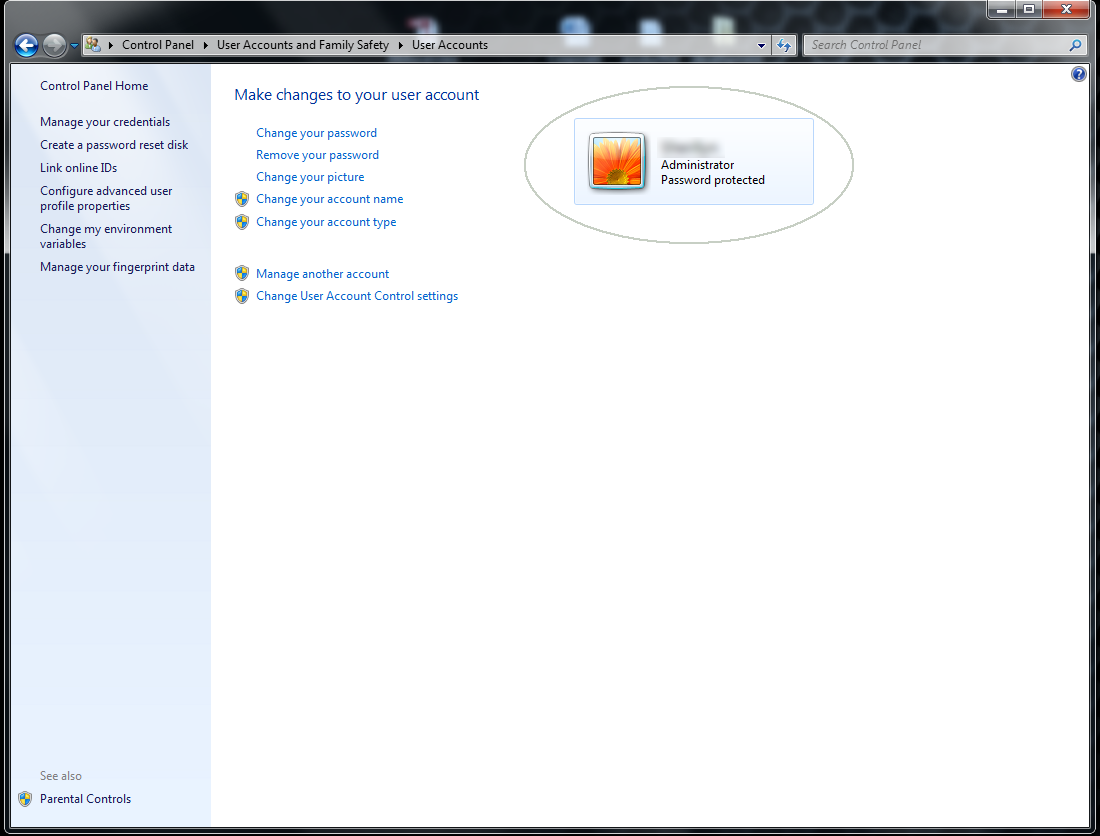
2. You are not logged in as an Administrator on your computer. Solution: go to Control Panel -> User Accounts.

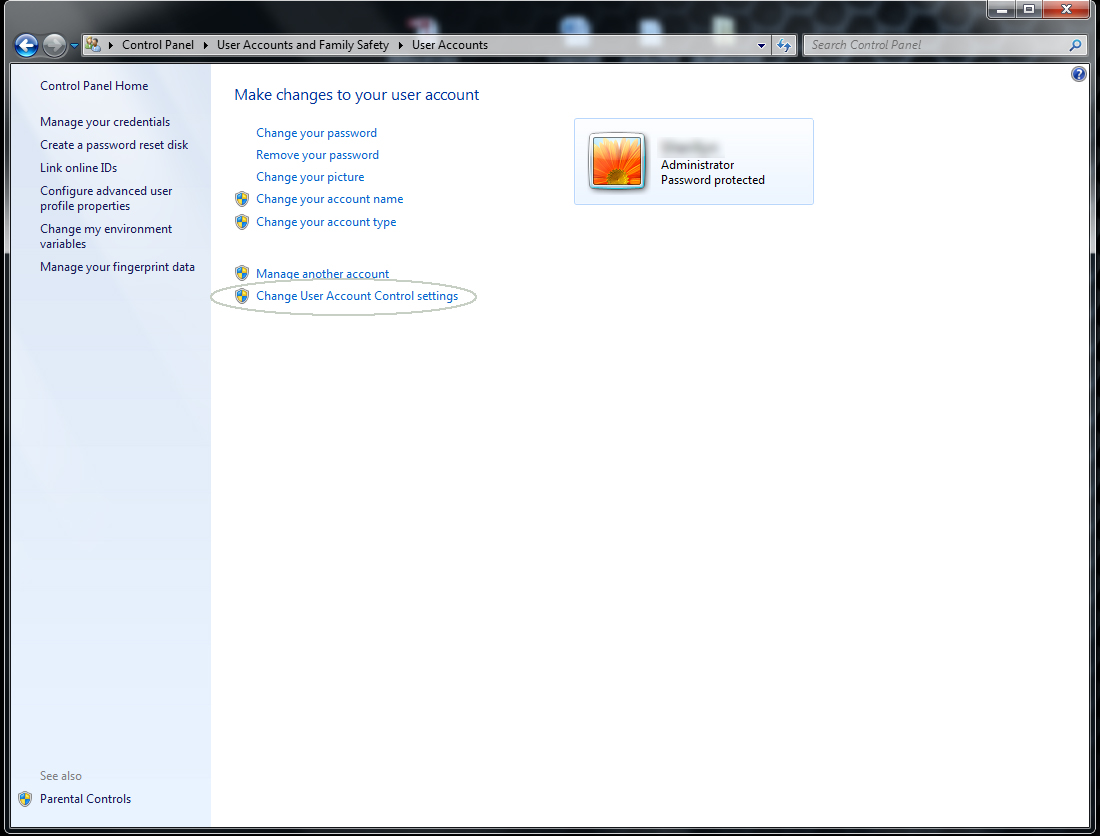
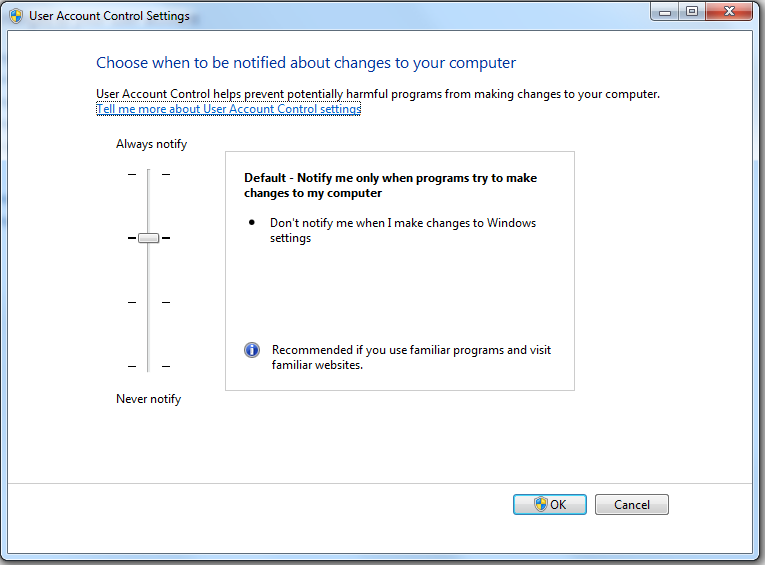
3. User account controls are interfering with the installation. Solution: go to Control Panel -> User Accounts. Select Change User Account Control Settings. Adjust the dial to set notification to 'Never notify'.


Unable to run the installer
1. The ZIP folder contents were not saved onto your computer, before trying to run the installer. Solution: from the Downloads page on our website, select the software ZIP folder and click Save (NOT open). This will save the ZIP folder to your computer. Go to the ZIP folder and extract all files into a folder of your choice on your computer. Once extracted open the folder and double click the 'Setup' file icon, this should begin the installation.
2. The files were not extracted first. Solution: confirm the files are downloaded on your computer. Go to the compressed ZIP folder and extract the files onto your computer. (On Windows 7, right click the file and select Extract All). Once extracted open the folder and double click the 'Setup' file icon, this should begin the installation.
Software installs and runs, but won't communicate with gauge/tool
1. Other USB devices are interfering with communication. Solution: ensure there are no other USB devices connected. A keyboard and mouse should be okay, but disconnect all other USB devices. Run the software. If it still won't connect or communicate with gauge, continue on to solution two.
2. USB interface box (or cable) with gauge/tool attached was connected to the computer prior to installing the software. Solution: uninstall the software (go to Control Panel -> Programs and Features -> right click the software [i.e. PPS SmartView] -> select Uninstall -> go through the uninstall procedures). Disconnect the USB interface box. Re-install the software. Only when installation is complete, connect the gauge's USB device. Windows will find two devices and should automatically install the necessary drivers. Wait until Windows confirms that the devices are installed and ready for use. Launch the software. If communication is still not successful proceed to solution three.
3. Installation of USB interface box (USB cable) drivers was flawed somehow. Solution: with the USB interface box still connected, manually uninstall the driver software. Go to Control Panel -> Device Manager. Under Ports (COM & LPT), right click the PPS device and select Uninstall. If a warning appears, click OK and if available, select the option "Delete the driver software for this device". Next under Universal Serial Bus controllers, right click PPS USB Composite Device (or USB Serial Converter) and select Uninstall. If a warning appears, click OK and if available, select the option "Delete the driver software for this device". If neither of these devices are found look for Unknown or Other devices and uninstall them if they appear to be the failed PPS device. Now disconnect the USB interface box. Repeat the software uninstall and re-install procedures listed in solution two. If communication is still not successful proceed to solution four.
4. There is an issue with hardware. You can try one or all of the following to narrow down the faulty component:
If none of these solutions work please fill out the support request form. Please try to include as much information as possible; computer operating system, computer make and model, software name and version you are trying to install, PPS gauges/tools and serial numbers, precise error messages, and the exact steps that you have tried before the problem occurred. Screenshots are always appreciated and can help to expedite a solution. To make screenshots, highlight the window you want to capture and press the <alt> and <Print Screen> keys to copy the image. Then paste into a program like Paint, save to a file and e-mail the file.
The ‘Download’ button is disabled
Communication with the gauge was not established. Solution: follow the troubleshooting tips in the above section to make sure the gauge is connected properly.
All buttons except ‘Read File’ or ‘Download’ buttons are disabled
No active data file is loaded. Solution: download a data file from the gauge or read data file from a file folder.
‘Selection start’, ‘Selection end’, ‘Add gradient’ and ‘Add event’ buttons are disabled
1. No active data file is loaded. Solution: download data file from the gauge or read data from the file.
2. No point is clicked in the graph. Solution: click on the graph to select a data point.
‘Delete from the beginning to the selected point' and ‘Delete from the selected point to the end' radio buttons in the Filter dialog are disabled
No point is clicked in the graph. Solution: close the Filter dialog window, click on the graph to select a data point and then open the Filter dialog window again.
‘Delete selection’ radio button in the Filter dialog is disabled
No selection is defined in the graph. Solution: close the Filter dialog window, define the selection (refer to section 4.7 of the software manual for more information) and then open the Filter dialog window again.
The ‘Get Program From Tool’ and ‘Program Tool’ buttons are disabled
Communication with the gauge was not established. Solution: follow the troubleshooting tips in the hardware section above to make sure the gauge is connected properly.
PPS71 Geothermal SRO Tool
The surface unit power LED does not light up.
1. There is no power to the box. Solution: check the power wire to ensure it is properly inserted.
2. Power fuse is blown. Solution: replace fuse (500 mA).
Signal LED of the surface unit does not flash after the power to the PPS71 SRO tool has been established.
1. Cable length settings (switches) inside the surface unit are not correct. Solution: set cable length switch to match the cable length. Please refer to Figure 27 in the User Manual for correct settings.
2. The surface unit may be defective. Solution: use a multimeter to check the output voltage from the surface unit. If the voltage is anything less than 60VDC, replace the surface unit. If the LED still doesn't flas after checking and/or replacing the surface unit, run diagnostics on the memory module.
3. The PPS71 Memory Module is not functioning properly. Solution: refer to the PPS71 Memory Tool User Manual (MANU-0011), Section 2.5 Running Diagnostics and run diagnostics on the Memory Module. This includes checking that the module is providing measurements for pressure, temperature, CCL, gamma and flow (if being measured).
4. The PPS71 SRO transmitter is not functioning properly. Solution: if the surface unit output voltage is 60VDC and the Memory Module passes a diagnostic check, but the LED problem persists, it is likely that the transmitter isn't working. Replace the PPS71 SRO Transmitter to see if this eliminates the problem.
PPS36 DepthWatcher
The power switch is on but no data is shown on the display.
Insufficient power supply. Solution: if powered by batteries, check them. If powered by an external adapter, check the cable and voltage (12 VDC).
The depth does not change and speed is always zero when the depth system is running.
Bad communication to the surface unit. Solution: check the encoder cable to ensure it is not broken or loose.
The tension value does not change when the tool string is going up or down.
Tension cable not working correctly. Solution: check the tension cable to ensure it is not broken or loose and replace if needed.
Can not connect to a PC using the PPS SmartLog software.
1. USB interface cable is defective. Solution: check if the USB interface cable is working by plugging another device in with the same cable or use another a cable.
2. USB driver not installed. Solution: make sure the USB driver is properly installed, please refer to the SmartLog Software Manual for complete instructions.
PPS33LR
Gateway not receiving sensor data
1. Gateway needs to be restarted. Solution: turn off the power to the Gateway. Wait 10 seconds and turn the power on again.
2. Sensor needs to be restarted. Solution: ensure you are in a non-harzardous area. Turn off the power to the sensor. Wait 10 seonds and turn the power on again.
3. Power is off. Solution: check if the sensor is powered on.
4. Battery power is low. Solution: replace the battery.
5. Sensor is out of range. Solution: move the sensor closer to the Gateway unit or system.
6. Gateway and/or the sensor antennas are not installed properly. Solution: check the antennas and reinstall if necessary.
7. Sensor and Gateway are not on the same channel. Solution: use the RemoteView software to ensure the sensor and Gateway are on the same channel.
8. Sensor needs a factory reset. Solution: perform a factory reset and use RemoteView software to recover the sensor from Radio Channel 0.
LED indicator on sensor is flashing red or flashing on start up
Battery power is low Solution: replace the sensor battery.
Sensor reading is inaccurate
There are three possible reasons the reading is inaccurate - the sensor's environmental temperature may be out of the calibrated range, the transducer may be damaged or the sensors calibration my be incorrect. For the correct solution and diagnosing the issue please contact PPS customer support.
Gateway is not receiving sensor data consistently
1. Sensor is not synchronized properly. Solution: allow a few minutes for sensor to synchronize with the Gateway.
2. Sensor is out of range. Solution: move the sensor into transmission range of the Gateway.
3. Gateway and/or sensor antenna are not installed properly. Solution: check the antennas and reinstall if necessary.
4. There may be interference within the transmission range. Solution: Remove any possible sources of interference.
5. Battery power is low. Solution: replace the sensor battery.
Gateway System display is off
1. Wiring may not be installed properly. Solution: review the wiring to ensure all connections are properly installed.
2. System needs to be restarted. Solution: restart the system.
Back up SD card is not recording data
1. SD card is full. Solution: clear data from the SD card or format the SC card.
2. SD card write-protect switch is enabled. Solution: check the write-protect switch is not set to the locked position.
3. Gateway is malfunctioning. Solution: contact PPS customer support.

